MANUAL 4 OF 5
In this fourth manual, you can read how to track with the app and how to add photos to the track.
Table of Contents
Tracking 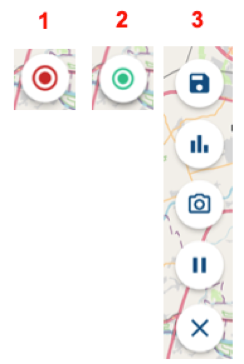
To make optimal use of tracking, first, check whether all permissions are correct. You can then arrange the tracking as described below.
- Click on the red button to start tracking.
- If this button is green, you know the tracking is on.
- Click again to open the track options.
The tracking options

- Save: Done with the track? Click here to save the track.
- Statistics: See live track statistics, such as distance and average speed.
- Add Photo: Add a photo from your gallery or take a photo directly.
- Pause/Restart: Clicking here will pause the track and pauses will not affect the track's stats.
- Close options: Click on the cross to collapse these track options
Save tracklog

- Tracklog name: Enter a nice name for the track here.
- Delete tracklog: Not satisfied with the final result of the track? Discard the recorded track immediately by clicking here. ATTENTION! This means that the recorded track is not saved, but permanently discarded.
- Travel Mode: By default, the travel mode in the app is driving, but this track was recorded on foot. Here you can easily and quickly change the track to the correct travel mode.
- Add photos afterward: Photos taken along the way, but not yet added to the track? Add these photos in particular and they will automatically be added in the right place in the track. ATTENTION! The correct permissions are required for this. Check whether the settings of your camera app are correct.
- Cancel: By clicking cancel you close this window and nothing changes.
- Save: If all information is correct, the photos have been added and you are satisfied, save the track. This will immediately appear in your tracklist. Uploading may take a while, check the upload queue for the status of your track.
- Discard: If the app crashes or is accidentally closed during tracking, open the app and this screen will appear. Can the track be thrown away, click here.
- Resume: If you are still on the road and track, click resume and the track will continue as if nothing happened.

Add photos to the track
Permissions
- If you want to open the camera for the first time while tracking, you will see this message. This permission is required to be able to take photos in the app.
- You will see this message if you want to add a photo from the gallery or save a photo you have taken. It is not necessary to give access to all photos, but we do recommend this. This way you can be sure that adding photos to the track is going well.
Add photos

- Return: Return to the home screen.
- Flash: Choose whether the flash should be on, off, or automatic.
- Aspect ratio: Choose the aspect ratio of your photo here.
- Zoom: Choose the zoom level of the camera here. The zoom options differ from phone to phone.
- Rotate camera: Switch between the front and rear camera with this button.
- Take a picture: Satisfied with the picture? Take the picture by clicking here.
- Open gallery: If you have taken a nice photo of the track outside the app, click here to add it.
- Name photo: Give the photo a nice name. This is not mandatory.
- Description photo: Give the photo a nice description. This is not mandatory.
- Save/Cancel: Satisfied with the result? Click save to add the photo permanently. If you are not satisfied with the image, click cancel to not add the photo.
Click here and open a previous/next manual of the app
2. App - Basics