MANUAL 5 OF 5
With the MyRoute-app it is also possible to navigate and receive 'turn-by-turn' instructions. Read in this fifth manual how you can immediately navigate all your beautiful routes with our app.
ATTENTION! To use the navigation module in our app, the Navigation Next subscription is required. This can be purchased via the webshop per month, year, or Lifetime.
Table of Contents
Start navigation
See App - Routes & Tracks to see how you can start navigation from a generated or custom route.
Route versus track
Before the explanation of the navigation itself can be explained, it is important to understand that there are differences between navigating a route or a track and when something in the app qualifies as a track. These differences affect the options you see when starting the navigation, the navigation screen, and the settings.
The main difference between a route and a track is that a route contains waypoints and a track only contains a drawn line. In most cases you could say the following:
- Do you see waypoints? The route navigation will be started.
- Don't see waypoints except start and end? The track navigation will be started.
This sounds quite logical. Yet there are also a few examples where it is a bit more complex.
- Round trip: Feels like a route, but is saved as a track and therefore uses a track navigation.
- A-B, scenic: You have adjusted, so that our program creates a scenic route. This method can be compared to a tour and will therefore run via the track navigation.
- A-B, fastest way: This method is a bit confusing because it's in between route and track navigation. This way you get more options than a real track navigation, but less than when a route with waypoints is started.
Route navigation
- Start: Click here to start navigation.
- Cancel: Click here to cancel and return to the home screen.
- Distance and duration: See the distance and duration of the ride here.
- Extra time: See here how much extra time may be added
- Start location: Choose here whether you want to calculate the navigation from your current location or the starting point.
- Route optimization: Select here whether the fastest or shortest route should be used. This option is only possible in car, motorhome, and truck mode.
- Allowed roads: Check here which roads may be used for navigation.
Track navigation

- Start: Click here to start navigation.
- Cancel: Click here to cancel and return to the home screen.
- Distance: See the distance of the ride here.
- Duration: See here the duration of the ride.
A-B navigation (fastest way)
- Start: Click here to start navigation.
- Cancel: Click here to cancel and return to the home screen.
- Options: Choose here which route option you prefer. The minimum is 1 option and the maximum is 3.
- Distance and duration: See the distance and duration of the ride here.
- Extra time: See here how much extra time may be added
- Route optimization: Select here whether the fastest or shortest route should be used. This option is only possible in car, motorhome, and truck mode.
- Allowed roads: Check here which roads may be used for navigation.
Restart navigation

If the navigation is accidentally closed, don't be afraid. When opening the app, this message will be displayed and navigation can easily be restarted.
Navigation screen
All options are checked for the explanation of the navigation screen. In the navigation settings, you can choose what you do not want to see.
Route navigation
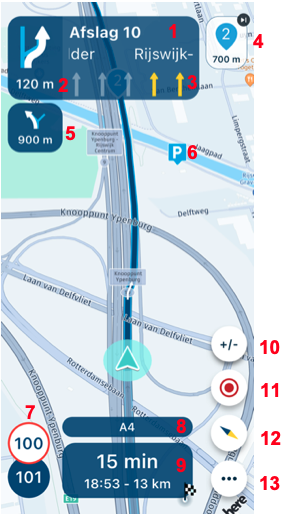
- Upcoming road: See the upcoming street name.
- Upcoming instruction: See the next instruction here.
- Lane instructions: See which lane is best for you to take at an exit, for example.
- Upcoming waypoint: See which waypoint will be next. Click on this button to immediately skip this waypoint.
- Next instruction: See what the next instruction will be. Have you checked the display of gas stations in the navigation settings? Then, if available, the nearest gas station will be shown here.
- Add POI: If you have added POIs to the route in the Routeplanner, you will see them on the map while navigating. Long press the POI to add it to the route.
- Speed: See here the allowed speed and how fast you drive yourself.
- Current road: See the name of the road you are currently driving on the screen.
- Time and duration: See here how long it is still driving. ATTENTION! Here you can choose between the end point, next shaping point, or viapoint. By default, the endpoint is shown. Click once to see the time and distance to the next shaping point. Then click once more to see the time and distance to the next viapoint.
- Zoom in/out: In principle, you will automatically zoom in and out, but click here to zoom in or out yourself. Go back to default? Click on the compass.
- Tracking: Click here to start, pause, or stop the track. The statistics can also be viewed here and a photo can be added.
- Compass: By default, the camera is set to dynamic, so it tilts and automatically zooms in and out. If you click once on the compass, you select the fixed camera. This is top-down and maintains the zoom level. This can be adjusted with the plus or minus. Keep the button pressed longer and the route will be shown in its entirety. If you have zoomed in or out, also click on the compass to return to the dynamic setting.
- Open menu: Click here to open the menu.
Track navigation
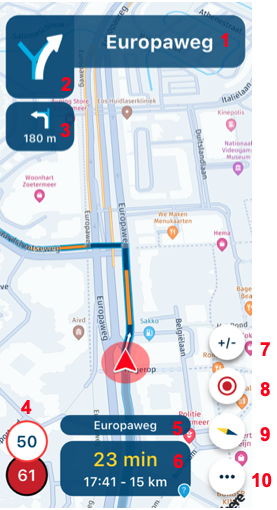
- Upcoming road: See the upcoming street name.
- Upcoming instruction: See the next instruction here.
- Next instruction: See what the next instruction will be. Have you checked the display of gas stations in the navigation settings? Then, if available, the nearest gas station will be shown here.
- Speed: See here the allowed speed and how fast you drive yourself.
- Current road: See the name of the road you are currently driving on the screen.
- Time and duration: See here how long it is still driving.
- Zoom in/out: In principle, you will automatically zoom in and out, but click here to zoom in or out yourself. Go back to default? Click on the compass.
- Tracking: Click here to start, pause, or stop the track. The statistics can also be viewed here and a photo can be added.
- Compass: By default, the camera is set to dynamic, so it tilts and automatically zooms in and out. If you click once on the compass, you select the fixed camera. This is top-down and maintains the zoom level. This can be adjusted with the plus or minus. Keep the button pressed longer and the track will be shown in its entirety. If you have zoomed in or out, also click on the compass to return to the dynamic setting.
- Open menu: Click here to open the menu.
Menu
Route navigation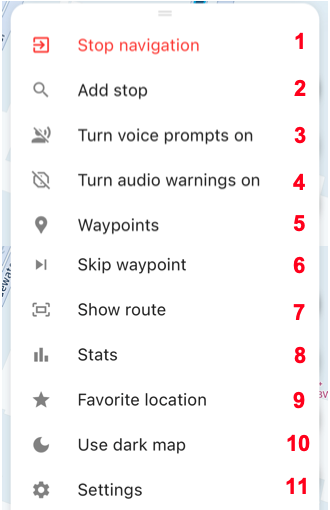
- Stop navigation: Click here to stop your navigation.
- Add stop: Click here to add a stop while navigation has already started. This can be a POI or an address of your own choice.
- Voice instructions on/off: Quickly turn your voice instructions on or off here.
- Audio alerts on/off: Quickly turn your audio alerts on/off here.
- Waypoints: If you click here you will see an overview of all route points. If you click on one, it will be shown on the map. Keep it pressed longer and you can continue the route from this waypoint.
- Skip waypoints: If you click here, you will skip the upcoming route point.
- Show route: Click here to make the route visible in its entirety on the map.
- Statistics: See here a small overview of your route so far.
- Favorite location: Easily save your current location as a favorite location here.
- Dark/Light Mode: Quickly switch between dark and light modes of the map here.
- Settings: Click here to open the navigation settings.
Track navigation

- Stop navigation: Click here to stop your navigation.
- Add stop: Click here to add a stop while navigation has already started. This can be a POI or an address of your own choice.
- Voice instructions on/off: Quickly turn your voice instructions on or off here.
- Audio alerts on/off: Quickly turn your audio alerts on/off here.
- Show route: Click here to make the route visible in its entirety on the map.
- Statistics: See here a small overview of your route so far.
- Favorite location: Easily save your current location as a favorite location here.
- Dark/Light Mode: Quickly switch between dark and light modes of the map here.
- Settings: Click here to open the navigation settings.
Navigation settings
Functional
The settings below affect how navigation is calculated and how the route may be modified while driving.
- Offline navigation: Are you going to drive somewhere where you are not sure about your internet? Then turn on the offline navigation. ATTENTION! Before using this option, you must make the map of the region in question available offline.
- Skip waypoints automatically: The route cannot be followed completely and you cannot pass a route point, by enabling this option this route point will be skipped automatically. You will then see a pop-up message with which you can still cancel the skipping. If you do nothing, the route point will be skipped.
- Traffic-aware route calculation: If this option is on, you will see the delays on the map when starting the navigation. If there is a long delay, the arrival time will turn yellow. The app will also choose the fastest route during a recalculation.
- Search for fuel stations along route: Choose here whether you want to see fuel stations along the route. This way you can easily add one to your navigation.
- Check if routes were made in the HERE map: Choose whether or not to check if the route has been created in the HERE map or not. If the route is not created in the HERE map, differences may arise between the created route and the final route that will be navigated.
- Check for route violations: It may sometimes happen that your route contains a road that you are in principle not allowed to drive on, but the route still runs on this road due to circumstances (think of a placed waypoint on a road with a weight limit for trucks). With this setting, you will receive a warning when starting the navigation and while driving if your route contains such a road.
- Check track navigation for errors: With this option turned on, you will receive an informative message before the navigation starts with points that may cause problems. Click no if you are not interested in seeing these points and click yes to show the points on the map.
- Allow track navigation for routes: Select here if track navigation for routes is allowed or not. If this function is on, track navigation will always be started, regardless of whether it is a route or track.
- Automatically start tracklog for routes: If you enable this setting, the track will start automatically when you start driving. ATTENTION! This function only works while navigating routes.
- Automatically save used routes and tracks for offline use: If you open a route/track in the navigation and start driving it, it will be automatically saved for offline use. This route/track can then be found between your downloads in the app.
Audio
While navigating it is possible to receive certain notifications. These can be switched on or off and adjusted in this menu.
- Volume: Adjust the volume of the voice instructions here. Play the audio sample to adjust the sound for notifications using the volume buttons.
- Voice: Adjust the voice of the instructions here.
- Voice prompts: Choose here whether or not you want to receive voice instructions. It is also possible to choose between fully spoken instructions or just a beep as a warning. To also hear descriptions of waypoints, you must select the 'On' option here.
- Number of voice prompts per instruction: Indicate here how many instructions you want to receive with an instruction. You can choose from four options, namely:
- Receive the instruction once, only the action itself
e.g. turn right - Also, get a reminder of the distance to the action
e.g. turn right in 500m - Get an extra reminder of the action to be taken
e.g. turn right after 2km - Get the furthest possible notice of the action to be taken
e.g. turn right after 5km
ATTENTION! Regardless of the instruction for the action, the other messages are not always guaranteed. Sometimes these do not exist.
- Waypoint notifications: Choose whether you want to receive a notification when you are almost at a waypoint. It is also possible to choose between all waypoints or just the waypoints.
- Speed warnings: Prefer to get a warning if you're speeding? Choose here to turn it on or off or only receive a warning if there is a known speed camera.
Screen layout
Everyone has different wishes for the navigation screen. Choose what you do or don't want to have on the screen by default with these settings and see what works or doesn't work for you!
- Current road: See the name of the road you are currently driving on the screen.
- Upcoming waypoint: See which waypoint will be next. ATTENTION! If you choose track navigation or A-B navigation, this option will not be visible by default.
- Next instruction: See what the next instruction will be.
- Upcoming street: See the upcoming street name.
- Lane instructions: See which lane is the best to take, for example at an exit. Here you can choose between a simple view or a detailed view.
- Traffic camera alerts: See a warning in the image if there is a known speed camera.
- Speed information: See the speed information on the screen, both how fast you drive yourself and how fast you are allowed here.
- Show next waypoint information: Choose here if you want to see information for the upcoming waypoint. Also, make a distinction whether you only want to see the information of viapoints or of all waypoints.
- Show original route: Choose here whether or not you want to continue to see the original route regardless of how you drive.
- Show tracklog: If you are tracking, choose here whether or not you want to see the track line.
Map layer
In addition to the instructions, it is also important to visually get the navigation as much as possible to your liking. Therefore, choose what the appearance of the map and position indicator should look like in these settings.
- Map theme: Choose here between the light or dark look of the card. ATTENTION! This is separate from the theme of the app itself. If you choose ‘Phone theme', the app itself will consider sunrise and sunset, but also when entering a tunnel.
- Map type: Choose here whether you want to see the map in the normal view or rather as a satellite view.
- Map details: Choose here whether you see the map in the normal view or a simplified view.
- Building view: Choose here whether or not you would like to see buildings on the map. If you do want to see buildings, you can also choose whether these buildings are shown in 2D or 3D.
- Vehicle restrictions: On the map, you can permanently see the restrictions of the specific vehicle. Indicate here which vehicle restrictions you want to see or whether you would prefer not to see them on the map.
- Position indicator color: Adjust the color of the position indicator here so that it is most visible to you.
- Position indicator circle: Choose here whether or not you want a circle around the position indicator.
- Zoom correction: Here you can indicate whether the map should be further zoomed in or further zoomed out.
- Tilt correction: Determine here whether you want to have more or less horizon while navigating.
Apple CarPlay
It is also possible to show the navigation via Apple CarPlay. If your phone is connected to CarPlay, MyRoute-app will appear in the list of possible apps.

- Click here to quickly open the last edited route.
- Click here to open the menu with search options. It is also possible to search and add a stop during active navigation.
- Click here to open the settings. This can be done both from the home screen and while navigating.
- See the various search options here to quickly navigate to your location.
- If you want to navigate to a specific address, click here to enter it.
Settings

- Voice prompts: Select here whether or not you want voice instructions.
- Audio warnings: Select here whether or not you want to receive audio alerts.
- Map style: Switch here between the normal view and the satellite view.
- Day/Night: Switch between the day or night appearance here. If you adjust this choice, it will remain selected by default.
Start CarPlay navigation

- Avoid settings: Click here to adjust the avoid options.
- More routes: Click here to choose an alternative route. ATTENTION! If there are no (good) alternatives, this button will not be shown.
- Start: Once you have found and clicked on the correct address, click on start to start navigation.
- Avoidance options: It is currently possible to avoid highways, toll roads, and ferries with CarPlay.
- Back: Click here to return to the navigation home screen.
CarPlay navigation screen

- Upcoming instruction: See the next instruction here.
- Lane instructions: See here which lane you should keep.
- Information: See here what your arrival time is and how long and how far it still takes.
- Permitted speed: See the permitted speed here.
- Current speed: See your current speed here.
- Show entire route: Click here to view the route in its entirety on the map. Click again to return to the follow mode.
- Skip waypoint: Click here to skip the upcoming waypoint. ATTENTION! This button is only visible on routes that contain waypoints.
- Arrows: If you click on these, you can move around the map and see what the route ahead will do, for example. Click on 'Done' to return to the follow mode.
- Next instruction: See what the next instruction will be.
- Notification: See here when there is a notification about a speed camera or section control. Click on the cross to remove this message and see the information again.
Android Auto
It is also possible to show the navigation via Android Auto. If your phone is connected to the Android Auto, MyRoute-app will appear in the list of possible apps.

- Click here to open the settings. This can be done both from the home screen and while navigating.
- Click here to open the menu with search options. It is also possible to search and add a stop during active navigation.
- Click here to quickly open the last edited route.
- See the various search options here to quickly navigate to your location.
- If you want to navigate to a specific address, click here to enter it.
Settings
- Voice prompts: Select here whether or not you want voice instructions.
- Audio warnings: Select here whether or not you want to receive audio alerts.
- Map style: Switch here between the normal view and the satellite view.
- Day/Night: Switch between the day or night appearance here. If you adjust this choice, it will remain selected by default.
Start Android Auto navigation

- Avoid settings: Click here to adjust the avoid options.
- Start: Once you have found and clicked on the correct address, click on start to start navigation.
- More routes: Click here to choose an alternative route. ATTENTION! If there are no (good) alternatives, only the route found will be shown.
- Back: Click here to return to the navigation home screen.
- Avoidance options: It is currently possible to avoid highways, toll roads, and ferries with Android Auto.
Android Auto navigation screen

- Upcoming instruction: See the next instruction here.
- Notification: See here when there is a notification about a speed camera or average speed check. Click on Close to remove this message and see the information again.
- Settings: Click here to adjust the settings while navigating.
- Search: Click here to go to the search screen and add a stopover if necessary.
- Exit: Click here to stop navigation and return to the Android Auto home screen.
- Permitted speed: See the permitted speed here.
- Current speed: See your current speed here.
- Show entire route: When you tap the screen, this button will appear. Click here to see the route in its entirety on the map. Click on this button again to return to the follow mode.
- Skip waypoint: When you tap the screen, this button appears. Click here to skip the upcoming waypoint. ATTENTION! This button is only visible on routes that contain waypoints.
- Lane instructions: See here which lane you should keep.
- Next instruction: See what the next instruction will be.
- Information: See here what your arrival time is and how long and far it still takes.
Click here and open a previous manual of the app
2. App - Basics