MANUAL 2 OF 6
This is the second guide in the series of app guides. In this manual, you will learn the basics of the app. This way you know where to find everything you need to use the app optimally.
Table of Contents
Home screen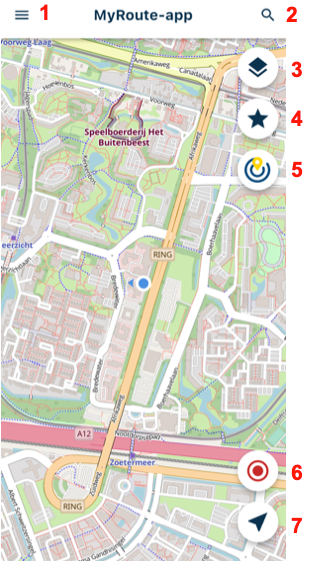
- Main Menu: Click here to open the main menu.
- Search address: Enter an address here to get this point directly on the map. Generate a route to this or make it a favorite directly by clicking on the star.
- Map Layers: Click here to switch maps.
- Favorites: Click here to go to your favorites.
- Nearby routes: See here which routes are near you. For a detailed explanation of Routes in the Neighborhood on the website, see the Manual 'Nearby routes'.
- Tracking: Click here to start tracking.
- Position indicator: With this button, it is possible to indicate how the map behaves with your location.
Search
In the app, you can easily search for an address, POI, route, track, and favorite. ATTENTION! If you use the app offline it is only possible to search for addresses and favorites and these must be located in the offline available region.
- Search bar: Enter here the address or location where the route should go.
- POIs: See here common POI categories such as gas stations, hotels, and cultural locations.
- Recent Searches: See your recent searches here. This goes back to your searches from the previous month. Click on the cross to remove the search from this list.
Map layers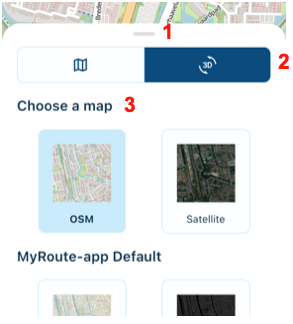
- Pop-up map layers: Here the different map options are shown. Move the bar to see more or less of the options at once.
- Map type: Choose here whether you prefer to have the map in 2d or 3d.
- Maps: Choose here which map you find most comfortable to work with.
Manage Favorites

- Favorites list: Here you will find all your favorites saved on your account.
- Edit Favorite: Change this favorite with this. ATTENTION! What you change or delete in the app also applies to the website.
- Current Location: Click here to add your current location to your favorites list.
- Name: Change the name of this favorite location here.
- Delete: Delete this favorite location.
- Cancel: Cancel your changes here.
- Save: Save your changes here.
Nearby routes
- Route information: Here you can see the basic information of this route nearby at a glance.
- More route information: Clicking here will show more information about the route that the RouteXpert has written down with passion and care.
- Open route: If you like this route, open it immediately in the app to see the details.
- Distance from current location: How far is around for you? Use this slider to indicate how far the route may start and/or end from your current location.
- Round trip: If you want to drive a route or prefer a tour, apply this choice using this button.
Position indicator

- If the arrow is empty, you are not tracked. The arrow is empty by default, which means you are not tracked in the map. This has no impact on your track, but only on how you see the map.
- If you click once on the arrow, you will see that it is now “filled”. This perspective is called top-down and ensures that your location will be tracked with the north always at the top.
- If you click on the arrow again, you will end up in the tilted view. The icon on the map will change from a ball to an arrow. The orientation of the map is upward by default in this mode. This option will also automatically zoom in and out based on your speed.
Menu 
- Home screen: Click here to return to the home screen. This can also be done by swiping to the left.
- Open account: Click here to go to the settings for your account or the app itself.
- Last route: Clicking here immediately opens the last edited route.
- Activity feed: See what your friends have created or tracked or even what the community has been up to.
- Routes & Tracklogs: See all saved routes & tracklogs here.
- Library: View the library containing the beautiful routes of our RouteXperts by clicking here.
- Favorites: Click here to see your favorites.
- Destination: Click here to quickly open the search function in the app from which routes, tracks, and locations can be found.
- Round trip: Click here to easily make a tour from the app.
- MRA Routeplanner: Easily edit your routes in the in-app Routeplanner. See App - In-app Routeplanner for more information.
- Route lab: You can also quickly go to the website from the app. Clicking here opens the in-app browser and opens the website directly.
Settings

- Account: See your account details here.
- Manage account: You can change something in your account by clicking this button. ATTENTION! What you change here also applies to the website.
- About MyRoute-app: If you want to know more about MyRoute-app or our products, click here to open the browser in the app and learn more about MyRoute-app.
- Location permissions: To quickly go to the settings for location access, click here.
- Travel mode: Easily switch between the different travel modes: By foot, Bicycle, Motorcycle, Car, Electric car, Motorhome, and Truck. See Travel mode for more information on these different modes.
- Privacy: Set how the tracks created with this app can be saved by default: Public, Friends, or Private.
- Distance notation: Quickly change between metric, imperial GB or imperial US here.
- App theme: Prefer a light or dark app theme? Determine here how the app looks for you or let the app determine this automatically based on your phone's preferences.
- App language: Change the language of the app here.
- Input settings: Choose here whether you use standard input or BarButtons, WunderLINQ, SilverFox, Carpe Iter, Carpe Iter BMW Control, or Remotek One. If you have any problems with the controllers, please contact the supplier itself. ATTENTION! Carpe Iter for iOS is currently limited. So always check the iOS support at Carpe Iter first.
- Navigation settings: See the navigation settings here and adjust them to your liking. These settings can also be reached from the navigation itself. See App - Navigation for more information about these settings.
- Offline maps: Need to navigate somewhere where you are unsure of the internet, download the offline map of this area here. This makes it possible to navigate without the Internet.
- Uploaded tracklogs: All uploads in the app will be shown here. If something goes wrong, check here first to see if the track has been uploaded.
- Downloads: Here you will find all routes, tracks, and files that you have downloaded.
- Review MyRoute-app: If you have an opinion about the app, please rate it by clicking here and writing a review.
- Share the app: Following routes together is even more fun, especially if the app can be shared. Via this button, the app can be quickly and easily shared via WhatsApp and e-mail, among other things.
- App walkthrough: Click here to see the virtual tour of the app.
- Sign Out: To log out of the app, click here.
- Delete account: We are of course very sorry about this, but if you want to completely delete your MRA account, click here. ATTENTION! If you delete your account here, you will permanently lose everything everywhere.
- Social Media: You can quickly go to one of our Social Media channels from the app via these buttons.
- Version of the app: This shows the current version and image number of the app. If you need help with the app, please provide this information immediately.
Uploaded tracklogs

- Remove successful uploads: This will immediately remove all successful uploads from the list. This only applies to the notifications, the tracks themselves remain.
- Track upload: A successful track upload.
- Photo upload: A successful photo upload.
- Upload failed: The track upload failed. Click on the cloud and upload the track.
- Delete single upload: Delete a single upload.
Travel mode
Adjust your travel mode in the app so that the app can be used completely as desired. The selected mode is used by default for all route calculations and tracklogs.
- By foot: This mode is useful for routes made for walking.
- Bicycle: This mode is useful for routes made for bike rides.
- Motorcycle: This mode is similar to the car mode, but also considers the capabilities of a motor.
- Car: In this mode, the rules belonging to a car are applied.
- Electric car: If you drive an electric car, our program takes your usage into account. Therefore, enter the data here so that it can be considered during navigation. In this mode you do not see gas stations, but charging stations.
- Motorhome: With a camper, some roads are impassable. Select this mode to ensure that our program takes your entered dimensions into account.
- Truck: If you select this travel mode, our program will consider the restrictions of your vehicle.
ATTENTION! If the route was created in the By foot or Bicycle mode, navigation is not available. Of course, it is possible to follow the route line.
ATTENTION! If you drive in EV, Camper, or Truck mode, always check whether the battery and roads that have been chosen are doing well. If in doubt, adjust your route.
Offline maps
Offline maps are required to navigate offline. If you ever drive somewhere without internet, make sure you have downloaded this region and you will not experience any problems due to the lack of internet. See App - Routes & Tracks for more information on syncing your routes to navigate offline routes.
- Download: This button is only visible if HERE has a new map update.
- Version: On the left is the current version number of your maps and on the right is the new version you will receive after downloading the update.
- SD card: Here you can indicate whether the data should be downloaded to your phone or your SD card ATTENTION! This option is only possible with an Android device.
- Regions: See all regions sorted by continent here. Then click on the specific region you want to download and the download will start immediately. Click on the cross to cancel the download.
Specific download warnings
- Wi-Fi warning: If you are going to download and you are not connected to the Wi-Fi, you will see this message.
- Download warning: When you are about to update the maps, you will see this message. For example, if you don't feel like the update right now, you can still cancel it.
- Download in progress: Some actions may not be performed while the download is in progress. So, if you want to do something that cannot be done at the same time, you will see this message.
Tips
- Leave the app open on your phone.
- Leave your phone's screen on while downloading.
- Do not download too many regions at the same time.
- Place your phone in the charger while downloading.
- Please give the app some time and do not download the needed region at the last minute.
- Don't download a new update just before you hit the road.
Click here and open a previous/next manual of the app