
MANUAL 7 OF 7
The MyRoute-app also lets you navigate and receive turn-by-turn directions. Read this last guide to learn how to navigate all your routes with our app.
ATTENTION! To use the navigation module in our app, you must have a Navigation Next subscription. This subscription can be purchased through the webshop on a monthly, annual, or lifetime basis.
Table of Contents
Starting the navigation
Read the App - Routes & Tracklogs section for the steps you need to take before starting navigation. Starting routes, an AB route, and a scenic route are slightly different and will therefore be discussed separately in this explanation.
Route versus Track
The app offers two navigation options: route navigation and track navigation. The most important thing to know is that there are slight differences in features between these navigation styles. If you enable the 'Navigate routes as tracks' option, track navigation will also open with your routes.
Route
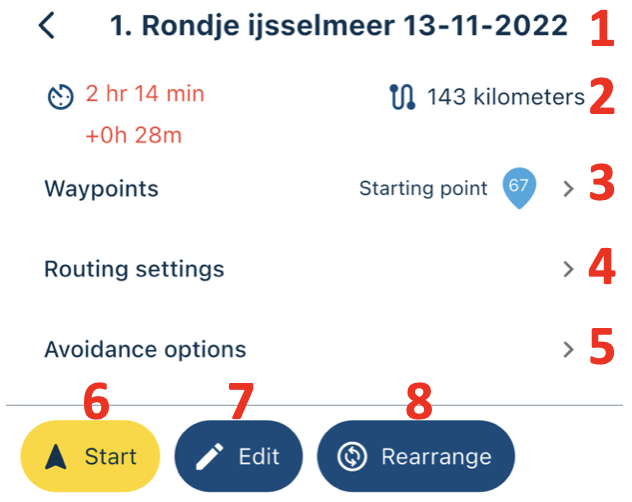
- Route name: See the route name here;
- Duration and distance: See the duration and distance here;
- Waypoints: See the list of waypoints here. Open the list to start from a specific waypoint;
- Route settings
- Start from nearest waypoint: Start the route from the nearest waypoint or not;
- Use current location: Start the route from your current location or not;
- Route optimization: Choose whether to use the fastest or shortest route.
- Start from nearest waypoint: Start the route from the nearest waypoint or not;
- Avoidance options: Indicate which roads should be avoided during navigation;
- Start: Click here to start navigation;
- Edit: Click here to open the route in the Routeplanner;
- Rearrange: This button is displayed when a route (with start and end points close together) does not run logically for your location. Click here to make the nearest waypoint the starting point.
AB route
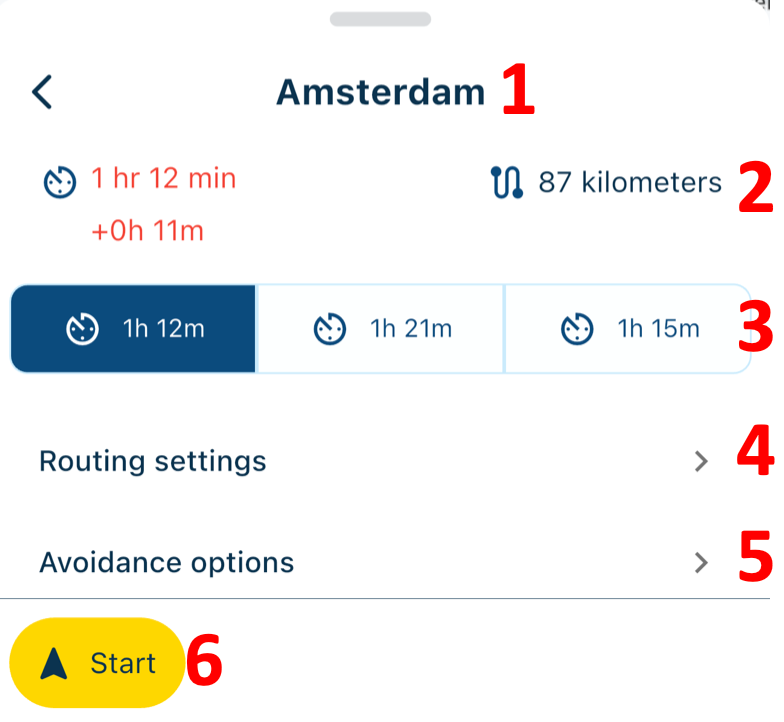
- Destination: View your final destination.
- Duration and distance: View the duration and distance.
- Options: If the route has useful alternatives, they will be shown here.
- Route settings
- Route optimization: Choose whether to use the fastest or shortest route.
- Avoidance options: Indicate which roads should be avoided during navigation.
- Start: Click here to start navigation.
Scenic route
When you start driving a scenic route, you will not see a different screen after setting the options. Navigation starts immediately when you click Navigate. For more information about scenic route settings, see App - Routes & Tracklogs.
Resume navigation
If navigation was accidentally closed, don't worry. This message will appear when you open the app, and you can easily restart navigation.
Navigation screen
For the navigation screen explanation, all options are checked. In the navigation settings, you can choose what you want to hide.
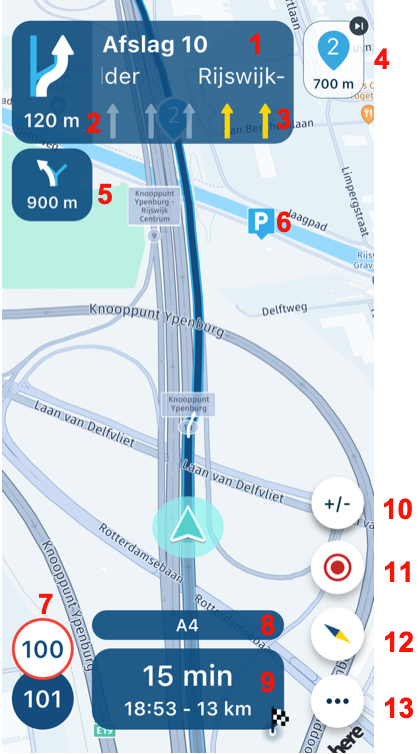
- Upcoming road: See the upcoming street name;
- Upcoming instruction: See the next instruction here;
- Lane instructions: See which lane to take, for example, at an exit;
- Upcoming waypoint: See which waypoint will be next. Click this button to skip this waypoint (only for routes, of course);
- Next instruction: See what the next instruction will be. If you have checked to show gas stations in the navigation settings, the nearest gas station will be shown here, if available;
- Add POI: If you have added POIs to the route in the Routeplanner, you will see them while navigating. Long-press the POI to add it to the route;
- Speed: See the speed limit and your current speed;
- Current street: See the name of the road you are currently on;
- Time and duration: See how much time remains. ATTENTION! Here you can choose between the end point, next formation point, or via point. The end point is shown by default. Click once to see the time and distance to the next formation point. Then click once more to see the time and distance to the next via point.
- Zoom in/out: Zooming will automatically occur, but click here to zoom in or out further. Want to return to the default setting? Click the compass.
- Tracking: Click here to start, pause, or stop the track. You can also view statistics and add a photo.
- Compass: By default, the camera is set to dynamic, meaning it's tilted and automatically zooms in and out. See App - Basics for more information about the different camera options;
- Open menu: Click here to open the menu.
Menu
This menu is visible during navigation. ATTENTION! Some options are not visible in certain navigation modes. This will be indicated accordingly.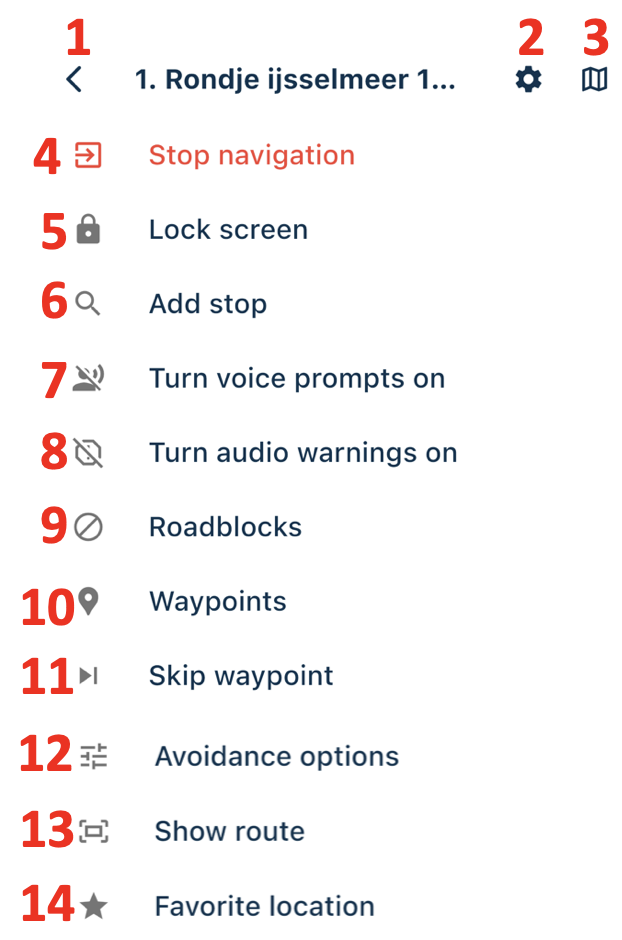
- Close: Click here to close the menu;
- Settings: Open the navigation settings here;
- Map settings: Open the map settings directly here;
- Stop navigation: Click here to stop navigation;
- Lock screen: Click here to lock the navigation screen. To disable this option, click the lock icon on the navigation screen;
- Add stopover: Click here to add a stopover while navigation is already in progress. This can be either a POI or a custom address. ATTENTION! This option is not available for scenic routes;
- Voice instructions: Quickly turn your voice instructions on or off here;
- Audio warnings: Quickly turn your audio warnings on or off here;
- Roadblocks: Add a redirect here and manage it;
- Waypoints: Click here to open the list of waypoints. ATTENTION! Only visible when navigating a route;
- Skip waypoint: Click here to skip the next waypoint. ATTENTION! Only visible when navigating a route;
- Avoidance options: Apply and enable avoidance options while navigating;
- Show route: Click here to view the entire route;
- Favorite location: Click here to save your current location as a favorite.
ATTENTION! When driving a scenic route, you'll see the Return to route option. If you need to deviate from the route, click here to return at the nearest point.
Roadblocks
You’re riding a beautiful route, but suddenly you come across a road closure. With our navigation, you can now easily add a detour to your route, allowing you to rejoin your route nicely after the closed road.
While navigating, go to Roadblocks in the menu and choose how you want to add the detour:
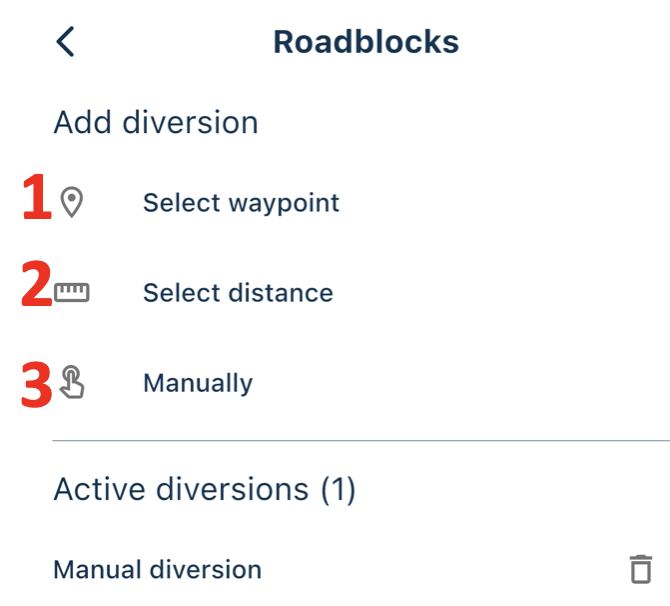
- Select a waypoint: The detour applies up to and including the selected waypoint, so you will be directed to the next waypoint;
- Select distance: Estimate the distance of the road closure yourself by entering a custom distance or choosing one of the suggested distances;
- Manually: Click on the route to enter the road closure yourself and choose the start and end point of the closure.
Once you have added a detour, you will see Active diversions. Click on a detour to show it on the map and, if necessary, remove it. So, when creating a detour, try out the different options to see what works best for you.
Settings
We strive to meet everyone's needs with our app. That's why we offer many settings you can adjust to optimize your experience. This manual lists and explains all the settings, making it a long list. Everything is listed in the same order as in the app, so you'll know exactly where to look for a specific setting.
Functional
The settings below affect how navigation is calculated and how the route may be modified while driving.
- Offline navigation: Are you going to drive somewhere where you are not sure about your internet? Then turn on the offline navigation. ATTENTION! Before using this option, you must make the map of the region in question available offline.
- Skip waypoints automatically: The route cannot be followed completely and you cannot pass a route point, by enabling this option this route point will be skipped automatically. You will then see a pop-up message with which you can still cancel the skipping. If you do nothing, the route point will be skipped.
- Traffic-aware route calculation: If this option is on, you will see the delays on the map when starting the navigation. If there is a long delay, the arrival time will turn yellow. The app will also choose the fastest route during a recalculation.
- Search for fuel stations along route: Choose here whether you want to see fuel stations along the route. This way you can easily add one to your navigation.
- Check if routes were made in the HERE map: Choose whether or not to check if the route has been created in the HERE map or not. If the route is not created in the HERE map, differences may arise between the created route and the final route that will be navigated.
- Check for route violations: It may sometimes happen that your route contains a road that you are in principle not allowed to drive on, but the route still runs on this road due to circumstances (think of a placed waypoint on a road with a weight limit for trucks). With this setting, you will receive a warning when starting the navigation and while driving if your route contains such a road.
- Check track navigation for errors: With this option turned on, you will receive an informative message before the navigation starts with points that may cause problems. Click no if you are not interested in seeing these points and click yes to show the points on the map.
- Allow track navigation for routes: Select here if track navigation for routes is allowed or not. If this function is on, track navigation will always be started, regardless of whether it is a route or track.
- Automatically start tracklog for routes: If you enable this setting, the track will start automatically when you start driving. ATTENTION! This function only works while navigating routes.
Audio
While navigating it is possible to receive certain notifications. These can be switched on or off and adjusted in this menu.
- Volume: Adjust the volume of the voice instructions here. Play the audio sample to adjust the sound for notifications using the volume buttons.
- Voice: Adjust the voice of the instructions here.
- Voice prompts: Choose here whether or not you want to receive voice instructions. It is also possible to choose between fully spoken instructions or just a beep as a warning. To also hear descriptions of waypoints, you must select the 'On' option here.
- Audio delay: Do you notice that instructions are sometimes only partly spoken? If so, turn on the audio delay here and the app will wait longer before saying the instruction.
- Number of voice prompts per instruction: Indicate here how many instructions you want to receive with an instruction. You can choose from four options, namely:
- Receive the instruction once, only the action itself
e.g. turn right - Also, get a reminder of the distance to the action
e.g. turn right in 500m - Get an extra reminder of the action to be taken
e.g. turn right after 2km - Get the furthest possible notice of the action to be taken
e.g. turn right after 5km
ATTENTION! Regardless of the instruction for the action, the other messages are not always guaranteed. Sometimes these do not exist.
- Waypoint notifications: Choose whether you want to receive a notification when you are almost at a waypoint. It is also possible to choose between all waypoints or just the waypoints.
- Speed warnings: Prefer to get a warning if you're speeding? Choose here to turn it on or off or only receive a warning if there is a known speed camera.
Screen layout
Everyone has different wishes for the navigation screen. Choose what you do or don't want to have on the screen by default with these settings and see what works or doesn't work for you!
- Current road: See the name of the road you are currently driving on the screen.
- Upcoming waypoint: See which waypoint will be next. ATTENTION! If you choose track navigation or A-B navigation, this option will not be visible by default.
- Next instruction: See what the next instruction will be.
- Upcoming street: See the upcoming street name.
- Altitude and compass: Show the altitude with compass direction.
- Lane instructions: See which lane is the best to take, for example at an exit. Here you can choose between a simple view or a detailed view.
- Traffic camera alerts: See a warning in the image if there is a known speed camera.
- Speed information: See the speed information on the screen, both how fast you drive yourself and how fast you are allowed here.
- Show next waypoint information: Choose here if you want to see information for the upcoming waypoint. Also, make a distinction whether you only want to see the information of viapoints or of all waypoints.
- Show original route: Choose here whether or not you want to continue to see the original route regardless of how you drive.
- Show tracklog: If you are tracking, choose here whether or not you want to see the track line.
Map layer
In addition to the instructions, it is also important to visually get the navigation as much as possible to your liking. Therefore, choose what the appearance of the map and position indicator should look like in these settings.
- Map style: Click here to open the map style settings.
Position indicator colour: Adjust the color of the position indicator here so that it is most visible to you.
Position indicator circle: Choose here whether or not you want a circle around the position indicator.
Zoom adjustments: With this setting it is possible to automatically zoom in and out based on your driving behavior. You can turn this option off or based on only your speed, only the driving instructions or a combination of both.
Default zoom correction: Here you can indicate whether the map should be zoomed in by default or zoomed out further.
Tilt correction: Determine here whether you want to see more or less horizon while navigating.
Opacity of lines: Determine how visible the route line is while navigating.
Width of lines: Determines how thick the route line is while navigating.
POI size: Adjust the size of the POI icons here.
Position indicator size: Adjust the size of the position indicator here.
- Map theme: Choose between a light or dark look for the map.
- ATTENTION! This is separate from the theme of the app itself. If you choose ‘Phone theme’ here, the app will take into account, for example, sunrise and sunset, but also when entering a tunnel.
- Colour scheme: Choose from one of the three color schemes.
- Edition: Select here which type of map you want to see while navigating.
- Building view: Choose here whether or not you would like to see buildings on the map. If you do want to see buildings, you can also choose whether these buildings are shown in 2D or 3D.
- Elevation difference: Choose here whether or not you want to see height difference on the map while navigating.
- Vehicle restrictions: On the map you can permanently see the restrictions of the specific vehicle. Indicate here which vehicle restrictions you want to see or whether you would rather not see them on the map.
Apple CarPlay
With MyRoute-app, you can also navigate using Apple CarPlay.
Start screen
If you start CarPlay without starting navigation from the app, you will see the map. Tap the screen to see the following options.
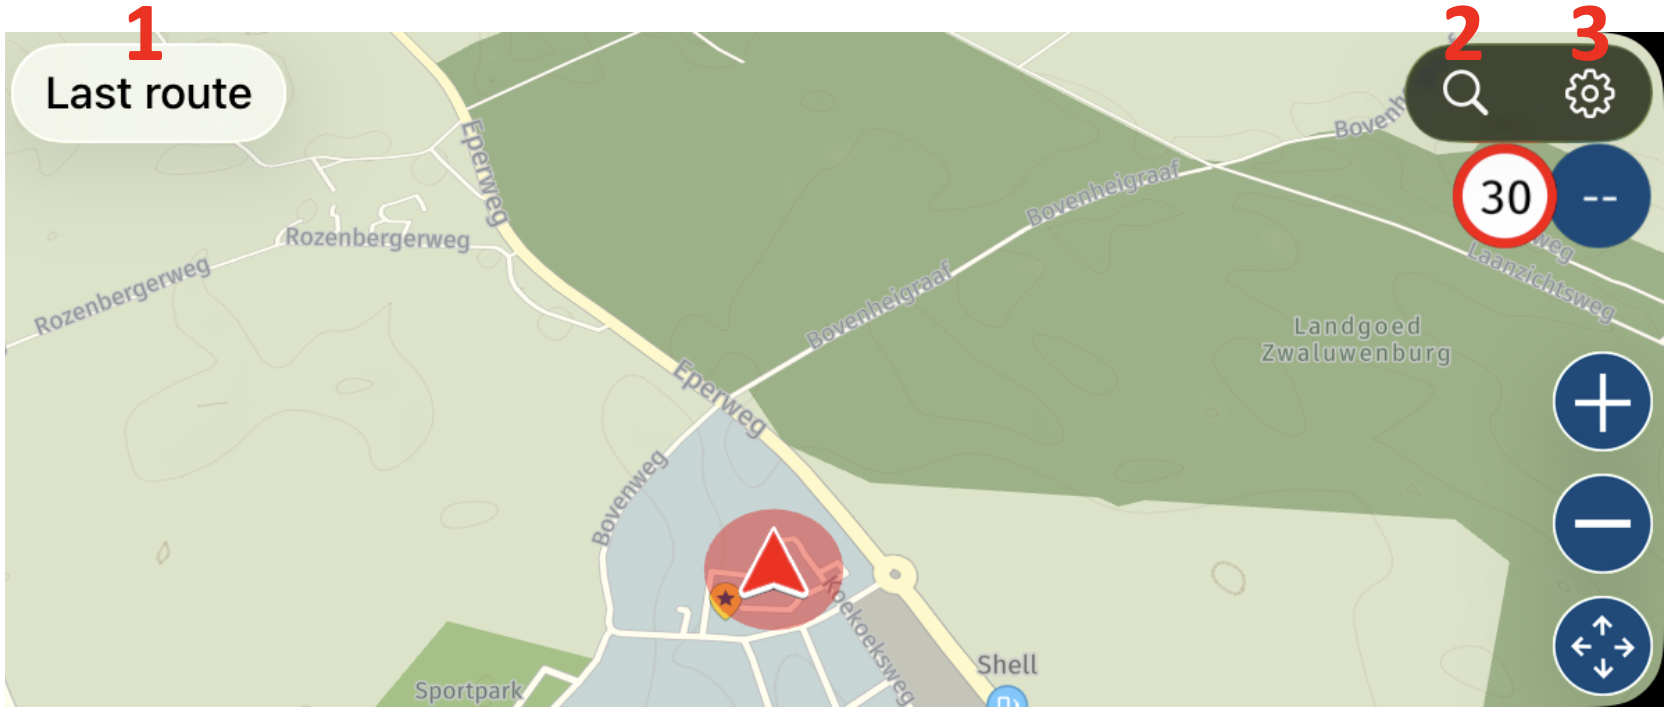
- Start your last route;
- Search for a destination;
- Open the settings.
Tap the magnifying glass to open the search screen. Here you can find your routes, typical POIs such as restaurants and petrol stations, as well as a keyboard that you can use to search for an address.
Under the settings, you can find the following options:
- Tracklogs: Start your track log here. You can then pause, save or delete it from this same menu, or view your statistics;
- Camera mode: Switch between North Up, Top Down and Automatic to display your orientation on the map according to your preference;
- Map style: Choose whether you want the map in Satellite or Standard mode and whether the theme should switch automatically or remain Light or Dark by default;
- Travel mode: Adjust your travel mode here.
Starting navigation
Once you have selected a route or a destination, you will see the following screen.
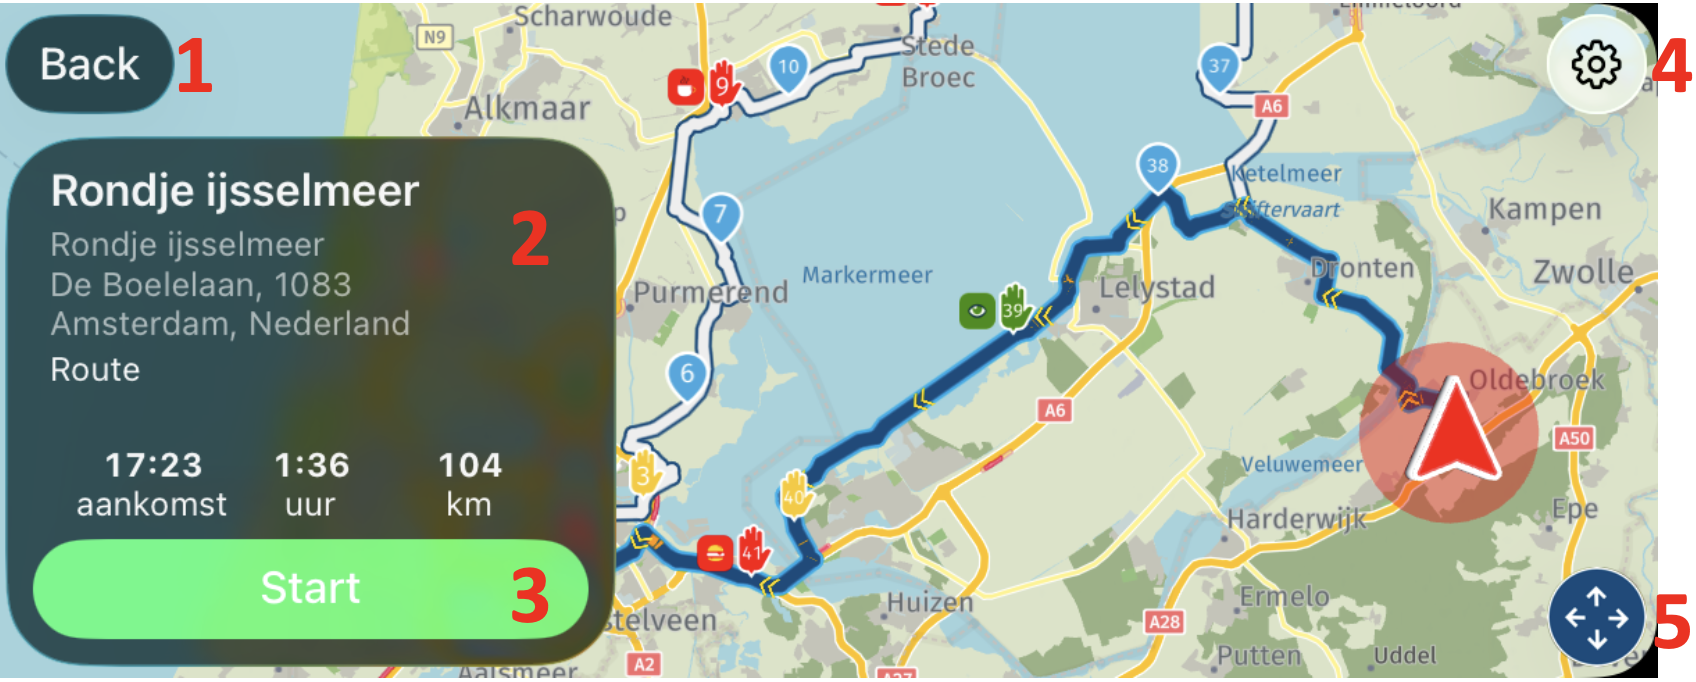
- Back: Return to the start screen;
- Route information: View information about your route/destination here;
- Start: Tap here to start navigation;
- Settings: Adjust which roads are and are not allowed;
- Arrows: Tap here to move around the map.
Navigation screen
The navigation screen shows what is possible within the restrictions of CarPlay and, of course, the functions you have enabled in the settings.
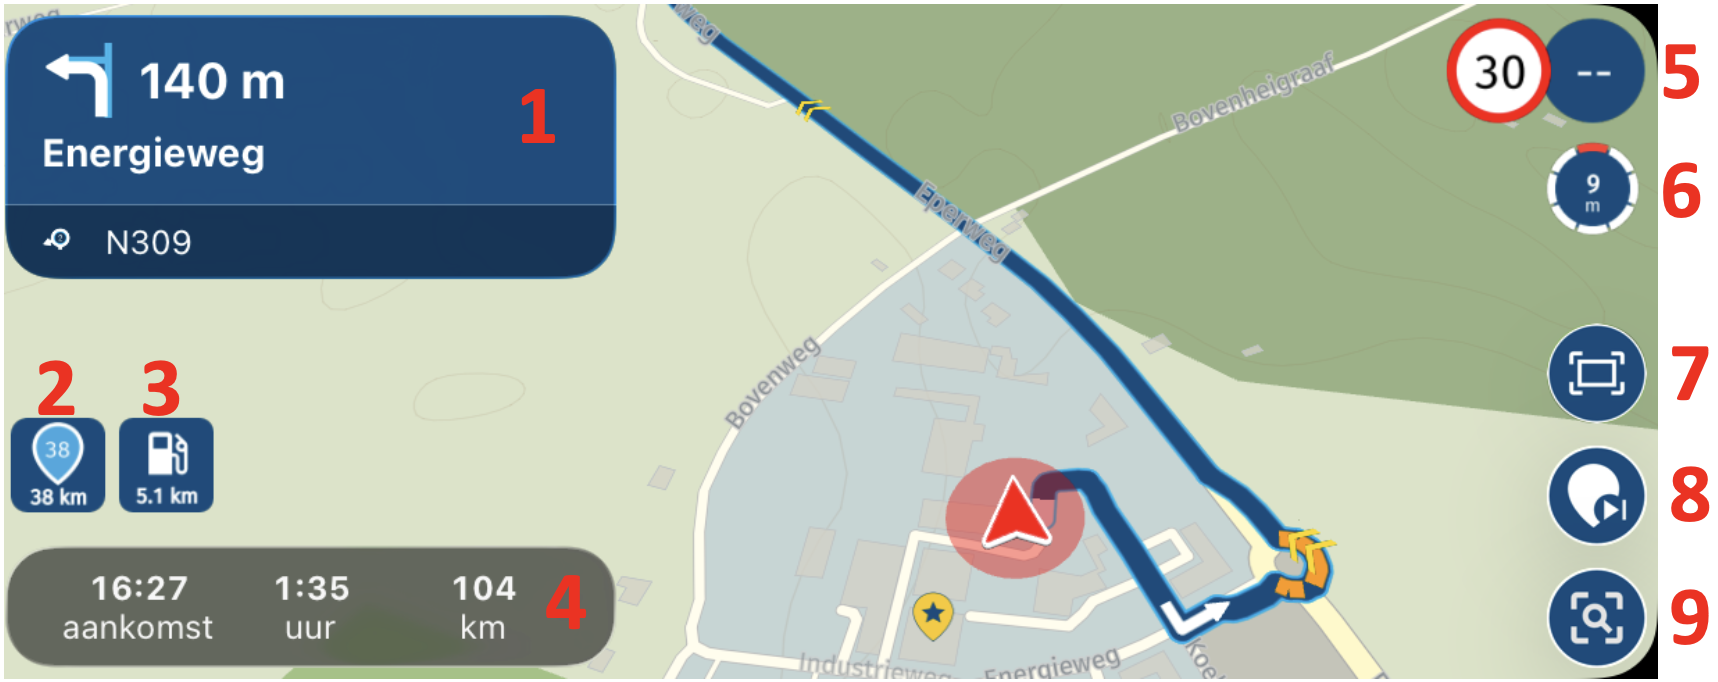
- Navigation instructions: View all instructions required for navigation here;
- Next waypoint: When a route is displayed, the next waypoint is shown here;
- Petrol station: See how far away the next petrol station is;
- Information: View the arrival time and how much time and distance remain;
- Speed: The permitted speed and your current speed are shown here;
- Altimeter and compass: See where north is and your current altitude;
- Entire route: Show the entire route;
- Skip waypoint: When following a route, you can skip the next waypoint here;
- Display options: Tap here to show the zoom buttons and move around the map.
Tap the screen to see the additional options to add a stop (magnifying glass) and access the settings (gear icon). You can also close navigation from here.
Navigation settings
When navigation is active, you can open the navigation settings by tapping the screen and then the gear icon. You will then see the following options.
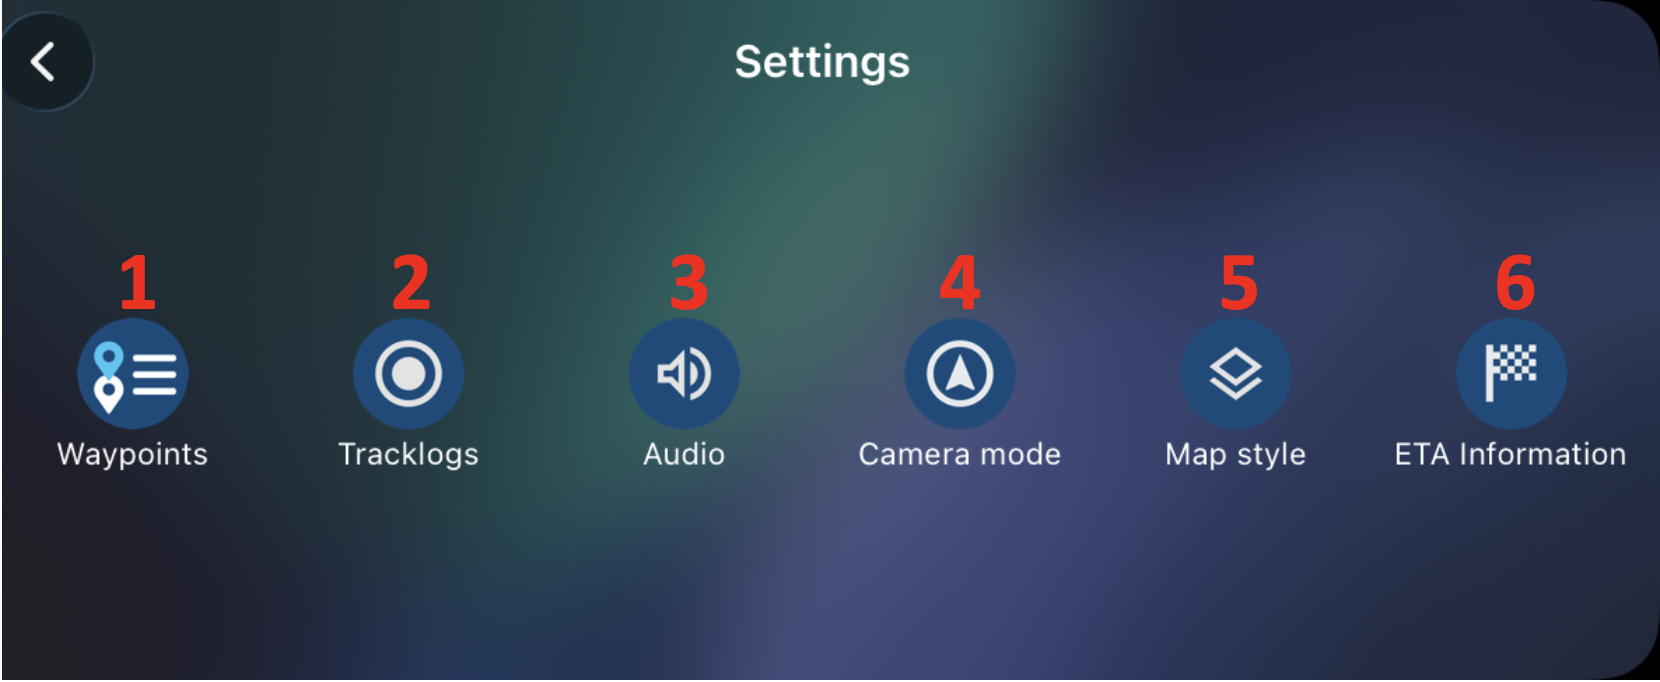
- Waypoints: Tap here to display the list of waypoints;
- Track logs: Start your tracklog here. You can then pause, save or delete it from this same menu, or view your statistics;
- Audio: Choose whether or not you want spoken instructions;
- Camera mode: Switch between North Up, Top down and Automatic to display your orientation on the map according to your preference;
- Map style: Choose whether you want the map in Satellite or Standard mode and whether the theme should switch automatically or remain Light or Dark by default;
- ETA information: Choose which information you want to see, such as arrival time, duration and distance.
 If you go to the list of waypoints, you can find all the information you provided for these waypoints. This includes the colour, name and any additional information. Tap a waypoint to navigate directly to it.
Tap the button in the top-right corner to navigate directly to the start or the nearest waypoint.
Android Auto
With MyRoute-app, you can also navigate using Android Auto.
Start screen
If you start Android Auto without starting navigation from the app, you will see the map. Tap the screen to see the following options.
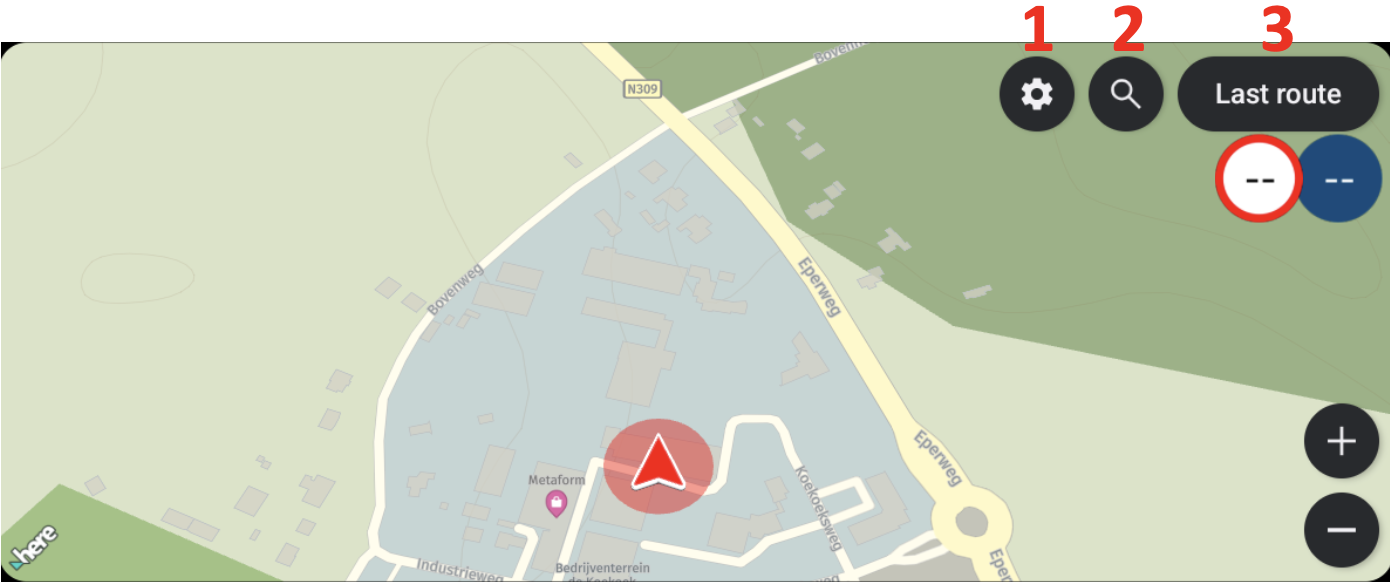
- Open the settings;
- Search for a destination;
- Start your last route.
Under the settings, you can find the following options:
- Tracklogs: Start your tracklog here. You can then pause, save or delete it from this same menu, or view your statistics;
- Camera mode: Switch between North Up, Top down and Automatic to display your orientation on the map according to your preference;
- Map style: Choose whether you want the map in Satellite or Standard mode and whether the theme should switch automatically or remain Light or Dark by default;
- Travel mode: Adjust your travel mode here.
Tap the magnifying glass to open the search screen. Here you can find your routes, typical POIs such as restaurants and petrol stations, as well as a keyboard that you can use to search for an address.
Starting navigation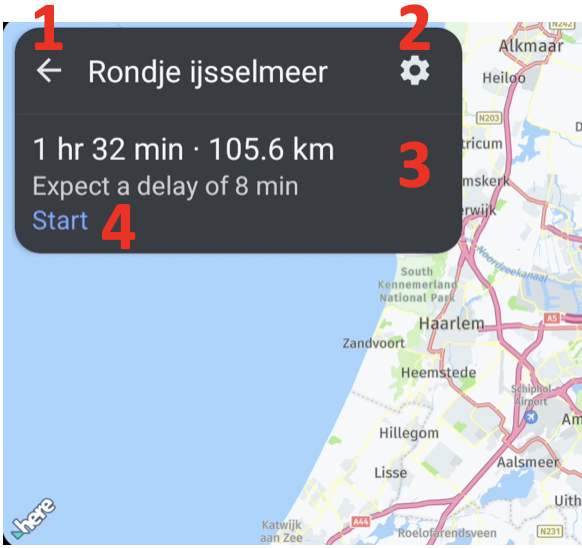
Once you have found a route or a destination, you will see the following screen.
- Back: Return to the start screen;
- Settings: Adjust which roads are and are not allowed;
- Route information: View information about your route/destination here;
- Start: Tap here to start navigation.
Navigation screen
The navigation screen shows what is possible within the restrictions of Android Auto and, of course, the functions you have enabled in the settings.
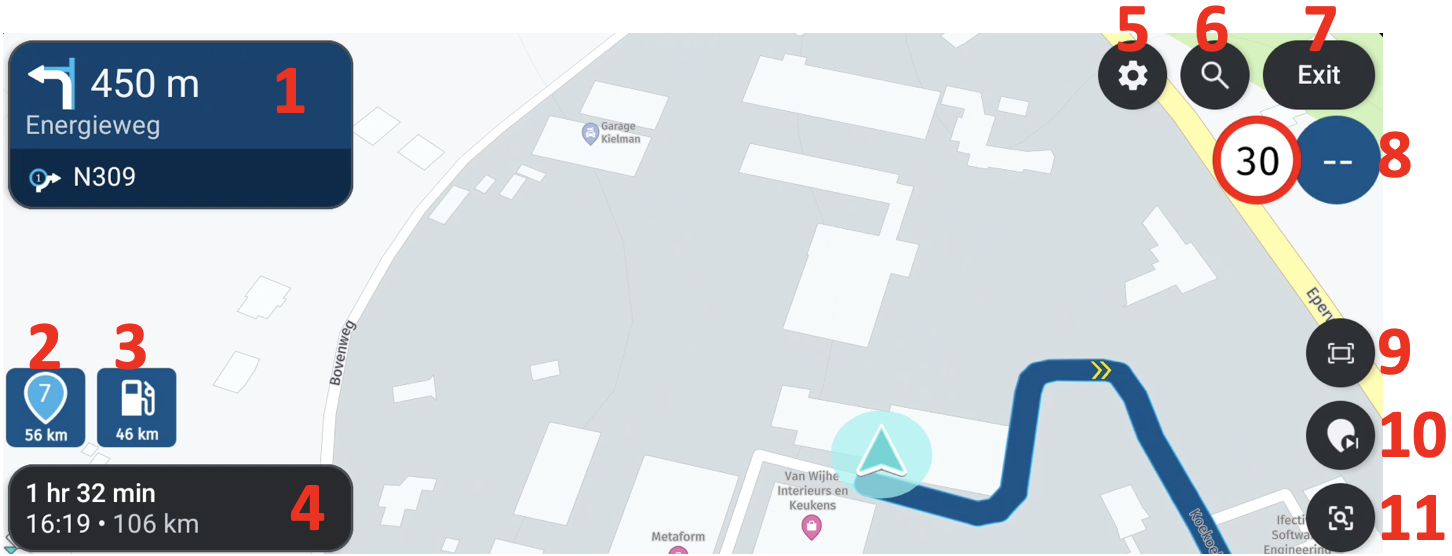
- Navigation instructions: View all instructions required for navigation here;
- Next waypoint: When a route is displayed, the next waypoint is shown here;
- Petrol station: See how far away the next petrol station is;
- Information: View the arrival time and how much time and distance remain;
- Settings: Open the settings while navigating;
- Search: Add a waypoint here if necessary;
- Close: Tap here to close navigation;
- Speed: The permitted speed and your current speed are shown here;
- Entire route: Show the entire route;
- Skip waypoint: When following a route, you can skip the next waypoint here;
- Display options: Tap here to show the zoom buttons and move around the map.
Navigation settings
When navigation is active, you can open the navigation settings by tapping the screen and then the gear icon. You will then see the following options.
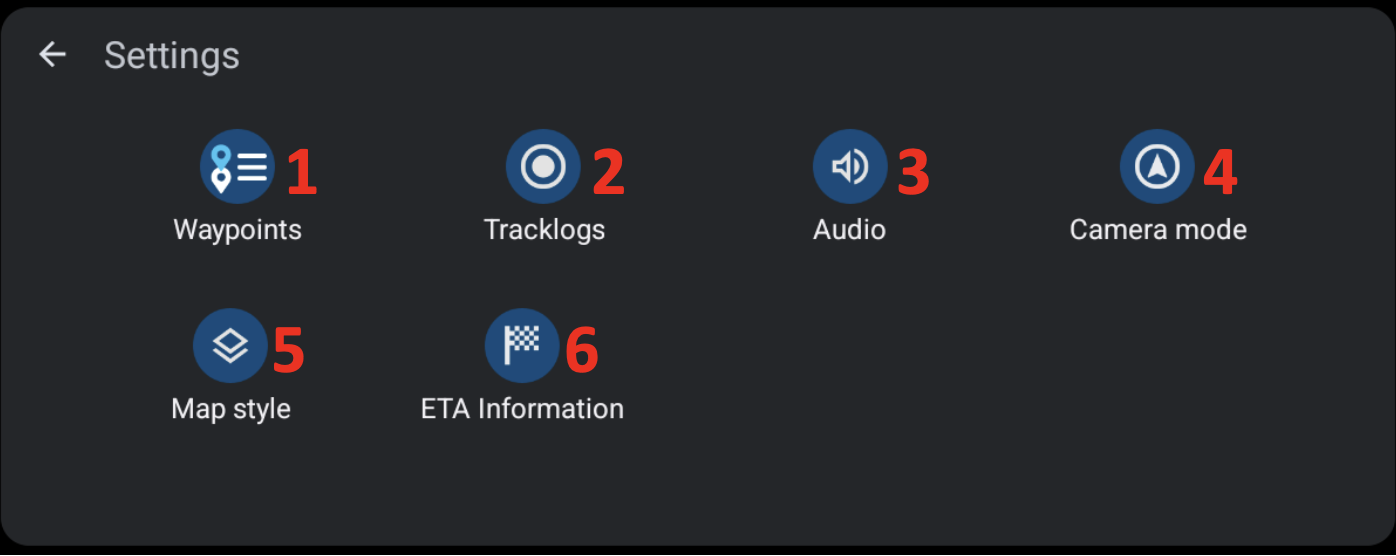
- Waypoints: Tap here to display the list of waypoints;
- Track logs: Start your track log here. You can then pause, save or delete it from this same menu, or view your statistics;
- Audio: Choose whether or not you want spoken instructions;
- Camera mode: Switch between North Up, Heading Up and Automatic to display your orientation on the map according to your preference;
- Map style: Choose whether you want the map in Satellite or Standard mode and whether the theme should switch automatically or remain Light or Dark by default;
- ETA information: Choose which information you want to see, such as arrival time, duration and distance.
 If you go to the list of waypoints, you can find all the information you provided for these waypoints. This includes the colour, name and any additional information. Tap a waypoint to navigate directly to it.
Tap the button in the top-right corner to navigate directly to the start or the nearest waypoint.
Click here and open a previous manual of the app
2. App - Basics