MANUAL 2 OF 7
This second manual is essential for learning the basics of the app. It explains everything you can do and where to find it all. If a feature of the app requires further explanation, you'll be referred to the appropriate manual.
Table of Contents
Home screen

- Profile picture: Click here to access your account settings. See App - Account for more information about this page;
- Map settings: Click here to adjust the map layer and other map settings;
- Tracking: Start tracking here. See App - Tracking for more information about tracking in the app;
- Compass: Adjust the camera settings here;
- Menu: Here you'll find the app menu.
Map settings
In addition to the instructions, it is also important to visually get the navigation as much as possible to your liking. Therefore, choose what the appearance of the map and position indicator should look like in these settings.
- Map layer
Position indicator colour: Adjust the color of the position indicator here so that it is most visible to you.
Position indicator circle: Choose here whether or not you want a circle around the position indicator.
Zoom adjustments: With this setting it is possible to automatically zoom in and out based on your driving behavior. You can turn this option off or based on only your speed, only the driving instructions or a combination of both.
Default zoom correction: Here you can indicate whether the map should be zoomed in by default or zoomed out further.
Tilt correction: Determine here whether you want to see more or less horizon while navigating.
Opacity of lines: Determine how visible the route line is while navigating.
Width of lines: Determines how thick the route line is while navigating.
POI size: Adjust the size of the POI icons here.
- Map theme: Choose between a light or dark look for the map
- ATTENTION! This is separate from the theme of the app itself. If you choose ‘Automatic’ here, the app will take into account, for example, sunrise and sunset, but also when entering a tunnel.
- Colour scheme: Choose from one of the three color schemes.
- Edition: Select here which type of map you want to see while navigating.
- Building view: Choose here whether or not you would like to see buildings on the map. If you do want to see buildings, you can also choose whether these buildings are shown in 2D or 3D.
- Elevation difference: Choose here whether or not you want to see height difference on the map while navigating.
- Vehicle restrictions: On the map you can permanently see the restrictions of the specific vehicle. Indicate here which vehicle restrictions you want to see or whether you would rather not see them on the map.
Compass
You can adjust the camera's orientation using the compass.

- No focus: With this camera mode, there's no specific focus, so the camera won't track you;
- North up: When the camera is in this mode, north will always be up. It will, however, automatically zoom in and out;
- Top down: In this mode, the camera continues to show a top-down view and has a fixed zoom level. ATTENTION! This mode is only available during navigation;
- Dynamic: In this mode, the image is tilted and follows your current location. It also automatically zooms in and out. ATTENTION! This mode is only available during navigation.
Menu
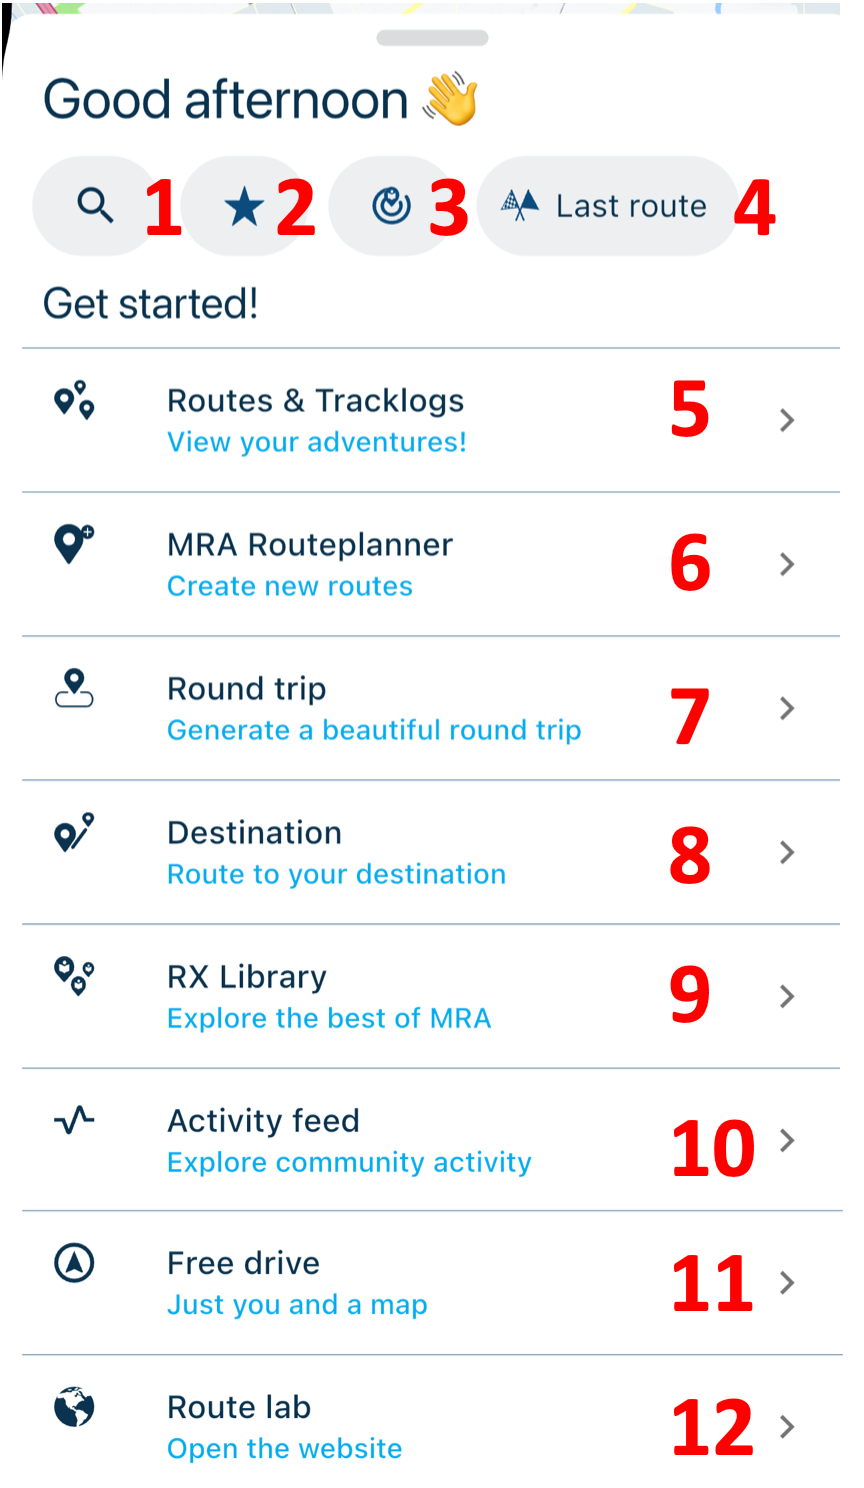
- Search: Search here for an address, favorites, routes, tracklogs, or POIs;
- Favorites: Find all your favorites here;
- Nearby routes: See which RouteXpert routes are near you;
- Last route: Click here to view your most recently created route;
- Routes & Tracklogs: Click here to view your routes and tracklogs. See App - Routes & Tracklogs for more information about routes and tracklogs in the app;
- MRA Routeplanner: Quickly create or edit a route with the in-app Routeplanner. See App - Routeplanner for more information about the Routeplanner in the app;
- Round trip: Open the round trip generator here to create a beautiful tour with just a few clicks. See App - Routes & Tracklogs for more information about creating a tour in the app;
- Destination: You can also open the search options from the menu using this button;
- RX Library: In the RX Library, you can find all the beautiful routes created by our RouteXperts. See App - Routes & Tracklogs for more information about the RouteXpert Library in the app;
- Activity Feed: See all activities from yourself, your friends, or the entire community;
- Free drive: Click here to show the map without route and instructions;
- Routelab: Prefer to use the website? Click here to open it in the in-app browser.
Search

- Current location: Click here to immediately show the current location on the map;
- Search everywhere: If you haven't applied a search filter, you can use the search bar to search anywhere within the app;
- ATTENTION! If you use the app offline, only results that are available offline will be shown.
- Search filters: Adjust the search filter here to search specifically within the category;
- Search history: View your search history here.
Favorites
Here you'll find all your favorites. Click on one to show more options. ATTENTION! For the explanation in this manual, the image has been adjusted to show all buttons. In the app, you can swipe to show the delete and edit options.
- Address: View the address of the saved favorite here;
- Navigate: If you have a Navigation Next subscription, you can navigate the route directly;
- Scenic: If you want a fun way to drive to this favorite, click here to make it scenic;
- Travel mode: If necessary, change your travel mode before departure;
- Remove: Click here to remove this favorite;
- Edit: Edit this favorite here.
Nearby Routes
- Route Information: Here you can see the basic information about this nearby route at a glance;1
- More Route Information: Read the information recorded by the RouteExpert here;
- Open Route: Open the route to view the details;
- Distance from Current Location: Use this slider to indicate how far the route may start and/or end from your current location;
- Route: Check this option to search for nearby round trips.
Free drive
In this mode, you'll see the map with minimal information and won't receive any instructions. You can open this mode from the menu, so no route line is displayed. If you do want to display a route, open free riding mode from within a route. See App - Routes & Tracklogs for more information on opening this mode from within a route, scenic route, or tour.
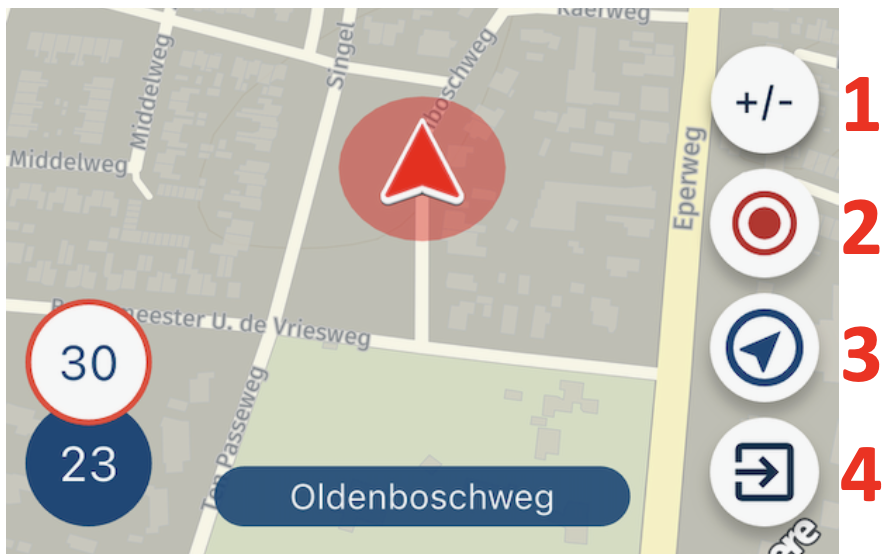
- Zoom: Click here to zoom in and out;
- Tracking: Start tracking here;
- Compass: Adjust the camera settings here;
- Close: Click here to stop free riding.
Click here and open a previous/next manual of the app