MANUAL 4 OF 7
Read all about routes and tracks in the app in this third manual. From opening and exporting to generating different types of routes.
Table of Contents
Routes and Tracks
From the menu you can directly open, download and navigate all your routes and tracks. ATTENTION! To navigate with our app, the Navigation Next subscription is required.
Open routes and tracklogs
- Routes & Tracklogs: This screen is displayed when you click on Routes & Tracklogs in the menu;
- Options: Click here to see the various options for routes and tracks. For example synchronizing, sharing, and permanently displaying on the map;
- Folder name: See the name of the folder you are currently in here;
- Personal: See all your own routes and tracklogs here;
- Friends: Here you can find your friends list. Click on the friend to see his/her routes and tracklogs that are set to public and friends;
- Groups: Here you can find the group list. Click on the group to see the routes and tracklogs;
- Events: Here you can find the event list. Click on the event to see the routes and tracklogs;
- Route screen: This is the screen that you see after the desired route has been clicked. In this screen you can see all the basic information at a glance;
- Route options: Click here to share, sync or delete the route;
- Statistics/Comments: Switch between route statistics and comments here;
- Information: Here you'll see some useful information about the route. More information is available for the tracklog, so be sure to scroll down for more details;
- Navigate: Click here to open the route for navigation;
- Free drive: Click here to ride this route without instructions;
- Edit: For all routes that can be edited, you'll see a pen icon here;
- Download: Click here to download the route/tracklog in the correct format;
- Like: Like this route or tracklog;
- Tracklog screen: This is the screen you see after clicking the desired tracklog. All basic information is displayed at a glance;
- Show entire route: Click here to show the entire route;
- Show current location: Click here to show your current location;
- Website: If the route cannot be edited in the app, you'll see this button here. This opens the route/track on the website.
Synchronize routes
In many areas the internet is not stable enough to provide good navigation or you prefer not to use your data for navigation. In that case you can choose to navigate offline, so that you are never dependent on the internet. Two things are important for offline navigation:
- Regions must be downloaded (see: App - Account)
- Routes must be synchronized

You can choose to synchronize your entire route library or individual routes. In both cases, you need to click on the three dots at the top right.

When you have clicked on the three dots, you will see one of these two menus. When you choose to synchronize your entire route library, the option will no longer be available for individual routes.
General information:
- Once the routes have been synchronized, you can always use them for offline navigation.
- If you edit a synchronized route on the website, open the app with internet to get it up-to-date again.
- The synchronized routes are simply in your familiar route list. They are therefore not shown separately in, for example, the download list.
- If you have not synchronized all routes and you are offline, the difference between available and unavailable routes will be shown by a slight color difference. You cannot click on the non-synchronized routes at this time.
Show routes on the map
It is also possible to always display routes on the map in the app. You can choose to display a single route, a folder containing multiple routes, or your entire route library.

When you have selected routes to be displayed permanently on the map, you will see this icon above your route list. From here, you can manage the displayed routes.

- Back: Return to the app's home screen;
- Show / Hide: Tap here to show or hide the displayed routes;
- Remove all: Tap here to remove all displayed routes from the map.
- ATTENTION! This only removes the routes from being displayed on the map. The routes themselves are NOT deleted.
- Color: Assign your preferred color to the route;
- Route: Tap here to center it on the map;
- Remove single route: Tap here to stop displaying only this route permanently on the map;
- Open route: Tap here to open the route.
Important to know
- Routes can only be displayed on the map if they have been synchronized.
- You can only permanently display your own routes on the map.
Export routes

You have clicked on a route that you want to download it. In this menu, select the format in which you want to export the route and then click on 'Download'. You will then see a pop-up message to choose what you want to do with this route. This way you can immediately share the route or open it in the list of downloads in the app.
The route can be found on your device no matter what you click. With Android, the route can now be seen in 'Downloads'. On iOS, the route can be found in 'Files'. If you click here on 'On my iPhone/iPad' you will see that a folder has been created called 'MyRoute-app'.
Import routes
Have you received a nice route and want to see it in the app? That's no problem either! Open the route on your device and select MyRoute-app. ATTENTION! The route is only imported into the app, so the route is not visible on the website.
Once the route is opened in the MyRoute app, you can immediately choose to navigate it or save it to your account.
Easily generate routes
With the app, it is possible to easily generate a route. For this, it is important to first know the different possible start options. Subsequently, it will be further explained how exactly it works.
The different possibilities to generate a route:
- Search: By clicking on the magnifying glass at the top right of the start screen you will be given the option to specify a location where you would like to go. Here you can choose an address, a place name, a company, but also a route name from your collection.
- Favorite: Open the favorites list and click on the relevant favorite location and a route will be created there.
- Place waypoint on map: Do you know approximately where you need to be and would you rather place the point on the map yourself? Go to the correct location and place the point by long-pressing the screen on this spot. This way a route point will automatically appear on the map to which the route can be made.
- Round trip generator: The round trip generator can quickly create an extensive tour for you. You just have to pass on a few wishes and it will do its utmost to make the best tour for you.
A-B route
Once you've entered or selected a destination, it will appear on the map along with any available information about that location. You can drive directly to this route by clicking Navigate, or you can change the route to a scenic route.
Scenic
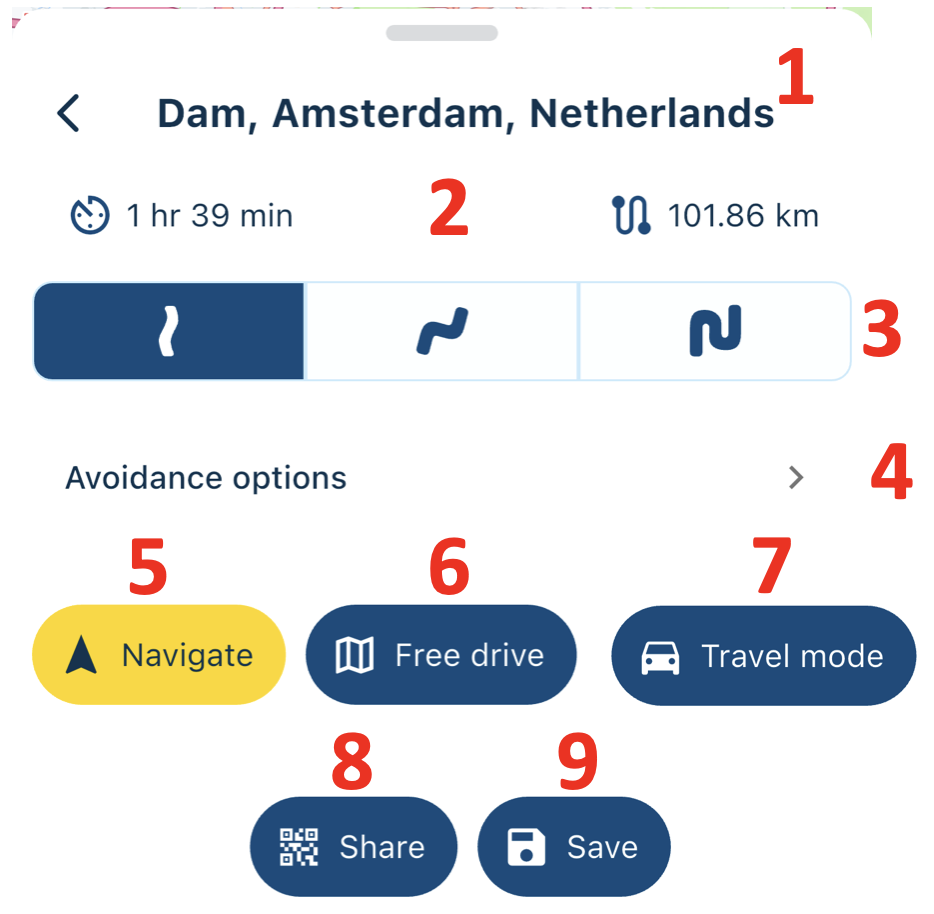
- Current location: See whereto the route will be generated;
- Distance and duration: See how far and how long the route will be;
- Curviness: Use these buttons to determine how winding the route can be;
- Avoidance options: Select which roads can and cannot be used for route generation;
- Navigate: If you have a Navigation Next subscription, click here to open the navigation in the app;
- Free drive: Click here to drive the scenic route without instructions;
- Travel mode: Before the route is generated or started, you can adjust the travel mode;
- Share: Click here to display a QR code so your travel companions can immediately open the same scenic route in their app;
- Save: If you'd like to ride this tour again, be sure to save it. The tour will now be added to your route list.
Round trip

- Current location: See the starting point of the tour here;
- Distance and duration: See how far and how long the route will be;
- Curviness: Use these buttons to determine how winding the route can be;
- Direction: Use this button to determine the direction of the tour. Clicking once moves the direction clockwise, and holding the button down for a bit longer moves it counterclockwise.
- ATTENTION! Sometimes the tour cannot be created in a specific direction with the selected distance, for example, a westbound tour if you live on the west coast. In this case, the generator will display an error message;
- Tour length: Use the slider to determine the approximate length of the tour;
- Driving direction: Indicate here whether the round trip should be clockwise or counter-clockwise;
- Avoidance options: Select which roads can and cannot be used for route generation;
- Navigate: If you have a Navigation Next subscription, click here to open the navigation in the app;
- Free drive: Click here to ride the round trip without instructions;
- Travel mode: Before generating or starting the route, you can adjust the travel mode;
- Save: If you'd like to ride this route often, be sure to save it. The route will now be added to your route list.
RouteXpert Library

Opening the RouteXpert Library immediately displays the routes in the region shown on the map. If there are no routes in that area, this will be indicated.
ATTENTION! If you've moved the map, you'll see the routes in the newly displayed area, not those from your current location.
- Back: This returns you to the overview;
- Route details: View the basic details of the selected route here;
- Info: Click here for more information about the route;
- Navigate: Click here to start navigation immediately;
- Share: Share this specific route here;
- Download: Click here to download the route;
- Open route: Click here to reopen the route.
Click here and open a previous/next manual of the app
2. App - Basics